Frequently Asked Question
Configuring PayPal Payment Gateway in ChargePanda
Last Updated a year ago
ChargePanda provides seamless integration with PayPal, allowing you to accept payments from customers securely and efficiently. To enable PayPal as a payment option on your website, follow the steps below.
Prerequisites
Before you begin, make sure you have the following information ready:
- PayPal API Username
- PayPal API Password
- PayPal API Signature
You can obtain these details by following the steps outlined in the next section.
Obtaining PayPal API Credentials
- Log in to Your PayPal Account: Log in to your PayPal business account. If you don't have an account, you'll need to create one.
- Access API Credentials: Once logged in, navigate to the "Profile" or "Settings" section of your PayPal account. Find the option to manage your API credentials or integration settings.
- Generate API Credentials: In the API Credentials section, you'll find options to generate API credentials. Choose the option that corresponds to "API Username," "API Password," and "API Signature."
- Create or Retrieve API Credentials: Depending on your PayPal account setup, you may need to create new API credentials or retrieve existing ones. Follow the prompts provided by PayPal to complete this process.
Configuring PayPal in ChargePanda
- Log in to the Admin Dashboard: Log in to your ChargePanda admin dashboard using your administrator credentials.
- Navigate to Payment Settings: In the admin dashboard, navigate to "Settings" and then select "Payment."
- Enable PayPal: In the Payment Settings section, locate the PayPal option and toggle it to enable.
- Enter API Credentials: Enter the PayPal API credentials you obtained earlier:
- API Username
- API Password
- API Signature
- Save Changes: After entering the API credentials, click the "Save Settings" button to apply the changes.
Setting Up IPN Notifications on PayPal
- Log in to your PayPal business account at www.paypal.com.
Click the settings icon at the top of your PayPal account page and then click Account Settings.
- On the Notifications page, click the Update link for the Instant payment notifications item.
- Click Choose IPN Settings to specify your listener's URL and activate the listener. The following page opens:
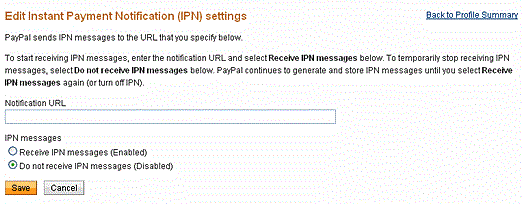
- Specify the URL for your listener in the Notification URL field. In your case it would be `https://domain.com/ipn/paypal`
- Click Receive IPN messages (Enabled) to enable your listener.
- Click Save. The following page opens:
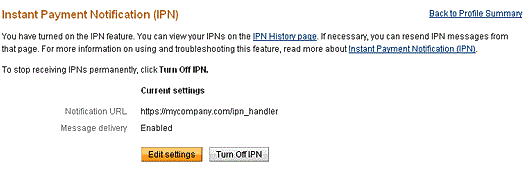
You can return to the Instant Payment Notification page to modify your notification URL, disable your listener, or turn off IPN.